Terminal design templates
Customize payment window to fit your webshop look and feel
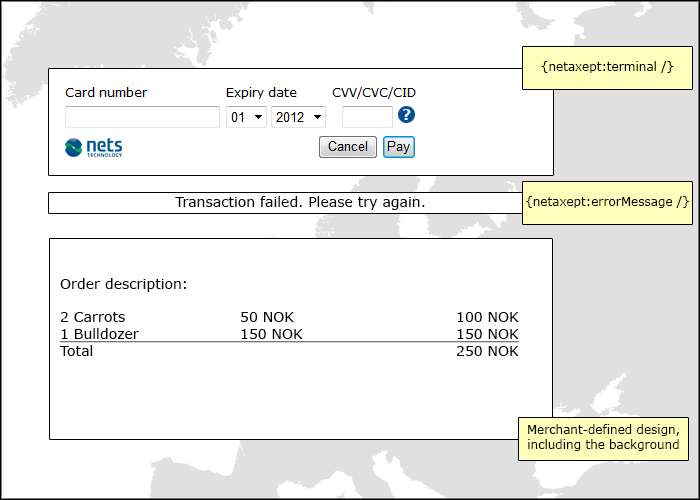
With Netaxept Template system, you can retain the look and feel of your website throughout the payment process, even though the actual payment window is hosted by Netaxept. Template system is based on custom tags embedded in normal HTML, with the ability to style templates through inline styling (for example: {netaxept:terminal style="color:red" /}) and uploaded or linked CSS. In addition to the HTML and style attributes, you can change the elements around the payment window (such as background color and image) and within the payment window (such as background color, text color and terminal border).
Templates and CSS are added, maintained and previewed in Netaxept Admin's Options => Terminal => Terminal design tab. The actual HTML your template will consists of is also entered there, together with special tags that decide where the payment window is to be placed, and where the text and images are placed on transaction basis. The tag showing the actual Netaxept payment window is {netaxept:terminal /}, allowing you to freely position the payment window to best suite your website’s design. Please note the extra space between the tag name and the slash (/). The HTML input is following JavaScript Object Notation (JSON).
The design can be as light or complex as you want. Due to this, Netaxept Customer Support doesn't provide support on designing and styling of HTML based templates. The merchant is expected to handle this area by themselves, while Netaxept Customer Support of course supports with requirements about the specific tags for templates. Read more about template design from Netaxept Admin User Guide >
Tools for customizing terminal templates
Terminal templates for different transactions
If you only have one template, this template can be activated in Netaxept Admin. However, if you have several templates (for example seasonal templates or different templates for special transactions), you can specify which template to use per transaction by adding terminalDesign parameter to the Register call. It should contain the name of the terminal template you have created in Netaxept Admin and that you want to use for the payment. With this parameter you can control the look of the payment window on a transaction basis. If this parameter is sent in, it will overrule any template that has been marked as active in Netaxept Admin and look up the correct template from the template names in the list of available templates. If the template cannot be looked up by name from Netaxept Admin, the default template will be used.
Template data
Template data is an array of key/value pairs and contains all the tags and their values that will replace the special HTML tags inside the template. This data is per transaction and will be merged into the active template. Several tags can be placed within curly brackets and different tags and their values are separated by a colon. If the template contains tags on the form {keyname /}, the region will be replaced by the value associated with the key "keyname".
For example to set the 2 tags MerchantTime and MerchantTemperature and their values, templateData should be set as follows. These 2 tags also need to be part of the HTML template design in Netaxept Admin. In its simplest form the HTML written in Netaxept Admin's Template design section could be as follows.
templateData:
{"MerchantTime":"13:26:59","MerchantTemperature":"+3C"}.

HTML in Template design section:
<p>Time is: {MerchantTime /}. Temprature is: {MerchantTemprature /}.</p>
<p>{netaxept:terminal /}</p>
Image upload
Templates need their images, and there are two options for accomplishing this. You can use the image upload functionality in Netaxept Admin if your need for images is quite limited (there are some restrictions on the upload). Doing this ensures that the images are delivered through an https-connection, avoiding browser warnings to the end-user about mixed content. The alternative is to link to images uploaded at a server of your choice. The advantage of this solution is that you are free to choose the format, dimensions and file sizes of the images, while the disadvantage is that you are responsible yourself for ensuring the https-delivery.
CSS
You are able to customize the formatting of your templates through CSS. In Netaxept Admin you can define a CSS file either through uploading it from a local stylesheet file or by linking it from an external source. The latter option requires the file to be accessible from a HTTPS request. The CSS can be defined either globally, for all templates, or for a specific template. Template-specific styling of course overrides global styling. For now, mobile template configuration in Netaxept doesn't support CSS.
Meta tags
You can add meta tags which can be used to inform the browser of various extra information. A popular example is the ability to override the character set used in the template, telling the browser how to interpret special characters. Meta tags can be added and maintained directly below the template editor in Netaxept Admin. You have to add the entire meta tag you want to have included.
For example:
<meta http-equiv="Content-Type" content="text/html; charset=utf-8">
Mini layout mode
For maximum control of the design of your checkout page, Netaxept has a mini payment window. This window is optimized to be as small as possible covering only input fields for a payment card. The minimized version is great to use within the Terminal design templates, in order to give you most of the web page area for your own design.
The mini payment window is supported both web and mobile terminals, but only for cards. If you are looking to implement other payment methods as well, we suggest you to implement a separate step in your site for selecting a payment method and implementing a path using single page for cards and a separate path for other payment methods. In that case, you need to send the name(s) of the payment method(s) in the "Payment method action list" parameter along the Register call.
To activate mini layout mode, set terminalLayout=mini in the Register call. Besides this, you need to design a template you want to use in mini layout mode and activate it either in Netaxept Admin or by specifying the template name in "terminalDesign" parameter in the Register call.
Since the mini payment window is optimized for staying as small as possible, error messages are not displayed inside the payment window. Instead, you can place the error message anywhere else on your webpage by using the specific error tag {netaxept:errorMessage /}. When using mini payment window, both the two special tags {netaxept:terminal /} and {netaxept:errorMessage /} need to be present in Netaxept Admin's Template design section for the mini payment window.
In mini payment window, no information about the order or merchant is displayed by default. Therefore, we recommend passing in "templateData" parameter in the Register call, to include for example the transaction amount and description of the order, if applicable.
Custom Templates
The Custom template functionality is an additional service and intended for merchants who need even more flexibility when designing their payment window templates. To be able to utilize Custom templates, you need to have the correct additional service chosen in your Netaxept agreement based on which the functionality will be enabled for your merchant. Also, to use Custom templates, the terminalLayout parameter must be set to "custom" to activate the Custom template specific tags.
Unless otherwise stated, what have been stated above regarding the regular templates, the same applies when using custom templates.
Tags used for Custom templates
The main difference between regular templates and custom templates is that the tag {netaxept:terminal /} is replaced with a set of individual tags described below. All tags are mandatory, except when explicitly mentioned for the tag. Tags are not case sensitive – some letters are capitalized here only for easier reading. Using templateData for passing data to the template in the Register call is also available.
Please note that the requirements for tags might change; optional tags may become mandatory, or vice versa, and new mandatory tags can be introduced. These changes would be enforced by the template editor in Netaxept Admin, which then means that you would need to update your template with these tags before changing other elements in your template.
All of these tags support both class and style-tags, enabling both inline styling and styling through CSS. If you wish to hide any of the information, for example order number, this can be done by adding style="display: none;"
An example of a basic custom template is:

<p>{netaxept:netsLogo /}</p>
<p>{netaxept:amount /}</p>
<p>{netaxept:currency /}</p>
<p>{netaxept:orderDescription /}</p>
<p>{netaxept:orderNumber /}</p>
<p>{netaxept:cardNumber /}</p>
<p>{netaxept:expiryDateMonth /}</p>
<p>{netaxept:expiryDateYear /}</p>
<p>{netaxept:securityCode /}</p>
<p>{netaxept:payButton /}</p>
<p>{netaxept:cancelButton /}</p>
<p>{netaxept:errorCode /}</p>
<p>{netaxept:errorMessage /}</p>
Information tags
- {netaxept:netsLogo /}
- Image – Nets logo that is unformatted and shown at 500 pixels wide and 165 pixels height. This can be altered using the style css-attribute, with height and width formatting. Comes in two themes, which you can set using the theme attributes: 1) color [default]: Use this for light backgrounds, 2) non-color: Use this for dark backgrounds.
- Example: {netaxept:netsLogo theme="non-color" class="" style="width:150px;height:45px;" /}
- {netaxept:amount /}
- Text – Transaction amount before fee and rounding, shown with currency symbol.
- Example: {netaxept:amount class="information" id="amount_text" /}
- {netaxept:fee /}
- Text – Fee based on either what is configured in the Register call or set in Netaxept Admin. If various fees are set based on card, this field would update itself based on the entered card number. Optional, but needed if fees are applied.
- Example: {netaxept:fee class="information" id="fee_text" /}
- {netaxept:rounding /}
- Text – Rounding if set up either via API or in Netaxept Admin. Updates itself based on the same criteria as fee. Optional, but needed if rounding is applied.
- Example: {netaxept:rounding class="information" id="rounding_text" /}
- {netaxept:totalAmount /}
- Text – The sum of the amount, fee and rounding. Updates itself based on the same criteria as fee. Optional, but should be included if using either fee or rounding.
- Example: {netaxept:totalAmount class="information" id="total_amount_text" /}
- {netaxept:currency /}
- Text – Currency for this transaction, for example "EUR", "USD", "NOK" or "GBP".
- Example: {netaxept:currency class="information" id="currency_text" /}
- {netaxept:orderDescription /}
- Text – Order description passed through the Register call for the transaction.
- Example: {netaxept:orderdescription class="information" id="order_description_text" /}
- {netaxept:orderNumber /}
- Text – Order number passed through the Register call for the transaction.
- Example: {netaxept:ordernumber class="information" id="order_number_text" /}
Card entry fields
- {netaxept:cardNumber /}
- Text box for entering the card number.
- Example: {netaxept:cardnumber class="card_entry" id="card_number_entry" /}
- {netaxept:expiryDateMonth /}
- Dropdown list for selecting month for the card expiry date.
- Example: {netaxept:expirydatemonth class="card_entry" id="month_card_entry" /}
- {netaxept:expiryDateYear /}
- Dropdown list for selecting year for the card expiry date.
- Example: {netaxept:expirydateyear class="card_entry" id="year_card_entry" /}
- {netaxept:securityCode /}
- Text box for entering the security code for the card.
- Example: {netaxept:securitycode class="card_entry" id="security_code_entry" /}
Buttons
- {netaxept:payButton /}
- Button for confirming either the purchase and/or the card registration for later purchases. Will have the text "Pay" or "Register" depending on the type of use.
- Example: {netaxept:paybutton class="navigation_button" id="pay_button" /}
- {netaxept:cancelButton /}
- Button for cancelling the current purchase or card registration, and the consumer would be taken back to the merchant site.
- Example: {netaxept:cancelbutton class="navigation_button" id="cancel_button" /}
Error handling
- {netaxept:errorMessage /}
- HTML DIV-tag displaying the error message, if any.
- Example: {netaxept:errormessage class="error_handling" id="error_message" /}
- {netaxept:errorCode /}
- HTML DIV-tag displaying the error code, if any.
- Example: {netaxept:errorcode class="error_handling" id="error_code" /}
- {netaxept:cardNumberErrorMessage /}
- Optional tag. HTML DIV-tag holding any error messages specific to the card number. If not specified, these messages are shown in the tag {netaxept:errorMessage /}.
- Example: {netaxept:cardnumbererrormessage class="error_handling" id="card_number_error" /}
- {netaxept:expiryErrorMessage /}
- Optional tag. HTML DIV-tag holding any error messages specific to the expiry date. If not specified, these messages are shown in the tag {netaxept:errorMessage /}.
- Example: {netaxept:expiryerrormessage class=" error_handling" id="expiry_error" /}
- {netaxept:secureCodeErrorMessage /}
- Optional tag. HTML DIV-tag holding any error messages specific to the security code. If not specified, these messages are shown in the tag {netaxept:errorMessage /}.
- Example: {netaxept:securecodeerrormessage class=" error_handling" id="security_code_error" /}
Easy payment specific tags
- {netaxept:maskedPan /}
- Text – Showing a truncated card number (first 6 and last 4 digits) to let the customer see which card they are using. For example "492500******0004". The tag is optional but is required if you use Easy payment.
- Example: {netaxept:maskedpan class="ep_information" id="masked_pan" /}
- {netaxept:issuerLogo/}
- Image – Showing the logo of the stored card, with size of 45 pixels wide and 27 pixels high. The tag is optional but is required if you use Easy payment.
- Example: {netaxept:issuerlogo class="ep_information" id="issuer_logo" /}
Easy Payment and Recurring Payment
It's also possible to use Easy payment and Recurring payment with the Custom template. The API calls would be used exactly as with regular templates, the only changes are some adjustments in the HTML you would need to add to the template. The specific HTML for initial and subsequent transactions should be contained within specifically named <div> tags in the template. The three DIV IDs described below are all mutually exclusive, meaning that only one of them will be displayed at any given time.
Initial transaction should be contained within a DIV with the ID "CardPayment" (case sensitive). Note the lack of the security code field which needs to be placed outside of the specific DIVs.
<div id="CardPayment">
{netaxept:orderNumber /}
{netaxept:amount /}
{netaxept:cardNumber /}
{netaxept:expiryDateMonth /}
{netaxept:expiryDateYear /}
</div> Initial card registration, when registering a card for later Easy or Recurring payments without performing a purchase at the same time (the Register call contains updateStoredPaymentInfo=true), should be contained within a DIV with the ID "UpdateStoredPayment".
<div id="UpdateStoredPayment">
{netaxept:cardNumber /}
{netaxept:expiryDateMonth /}
{netaxept:expiryDateYear /}
</div>
Subsequent transaction in the payment window is only applicable for Easy payment. To show the information required for the second transaction onward, you should include a DIV with the ID "EasyPayment".
<div id="EasyPayment">
{netaxept:maskedPan /}
{netaxept:issuerLogo /}
</div>
Regarding security code, the {netaxept:securityCode /} tag should not be within any of these tags, but handled outside of these DIVs, as if the template was not going to be used for registering tokens for Easy payment or Recurring payment.
An example of a complete custom template which relies on a linked CSS file. It accommodates regular payments, card registration for Easy or Recurring payment and subsequent transactions for Easy payment.
<h1>Test store</h1>
<div class="order_info">
{netaxept:netsLogo theme="non-color" style="width:150px;height:45px;"/}
<span class="order_info_row_label">Order Description:</span>
<div id="order_description">{netaxept:orderDescription /}</div>
</div>
<div class="card_details" id="CardPayment">
<span class="order_info_row_label">This template section is used for payments</span>
<div class="card_details">
<div class="card_details_row">
<span class="order_info_row_label">Ordernumber:</span> {netaxept:orderNumber /}
</div>
<div class="card_details_row">
<span class="order_info_row_label">Amount:</span> {netaxept:amount /}
</div>
<div class="card_details_row">
<span class="order_info_row_label">Currency:</span> {netaxept:currency /}
</div>
<div class="card_details_row">
<span class="order_info_row_label">Fee:</span> {netaxept:fee /}
</div>
<div class="card_details_row">
<span class="order_info_row_label">Rounding:</span> {netaxept:rounding /}
</div>
<div class="card_details_row">
<span class="order_info_row_label">Total amount:</span> {netaxept:totalAmount /}
</div>
</div>
<div class="card_details_head">Card information</div>
<div class="card_details_row">
<span class="card_detaild_row_label">Card Number:</span>
{netaxept:cardNumber class="sample" /}
{netaxept:cardNumberErrorMessage style="color: red;" /}
</div>
<div class="card_details_row">
<span class="card_detaild_row_label">Validity:</span>
{netaxept:expiryDateMonth class="sample"/} {netaxept:expiryDateYear class="sample" /}
{netaxept:expiryErrorMessage style="color: red;"/}
</div>
</div>
<div class="card_details" id="UpdateStoredPayment">
<span class="order_info_row_label">This template section is used to register the card without payment</span>
<div class="card_details_row">
<span class="card_detaild_row_label">Card number:</span>
{netaxept:cardNumber class="sample" /}
{netaxept:cardNumberErrorMessage style="color: red;" /}
</div>
<div class="card_details_row">
<span class="card_detaild_row_label">Validity:</span>
{netaxept:expiryDateMonth class="sample"/}
{netaxept:expiryDateYear class="sample" /}
{netaxept:expiryErrorMessage style="color: red;"/}
</div>
</div>
<div id="EasyPayment">
<div class="card_details_row">
<div>
<span class="card_detaild_row_label">Masked Pan</span>
{netaxept:maskedPan /}
{netaxept:issuerLogo /}
</div>
</div>
</div>
<div class="card_details_row">
<span class="card_detaild_row_label">CVV2/CVC2/CID:</span>
{netaxept:securityCode class="sample" /}
{netaxept:secureCodeErrorMessage style="color: red;" /}
</div>
<div>
<div class="footer_block">
{netaxept:cancelButton /}
{netaxept:payButton /}
</div>
<div class="error_block">
{netaxept:errorMessage /}{netaxept:errorCode /}
</div>
</div>