Netaxept hosted payment window
Netaxept payment window is available in two- and single-page mode. After decided between two and single, you can choose either to use our standard payment window or customize it, totally or partially, to retain the look and feel of your website or app throughout the purchase and checkout process, and still feel secured since the actual payment window is hosted by Nets. Modifications can be done via API and in Netaxept Admin. Read more about the terminal customisation
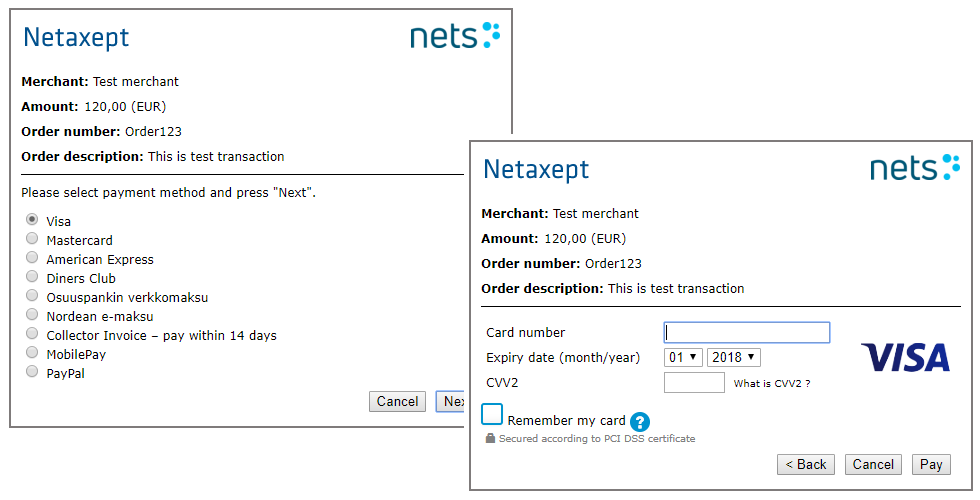
Netaxept payment window in two-page mode
In two-page mode the customer will see first the page where they can choose the desired payment method. After it is selected, they are directed to the actual payment window or directly to the site of the selected payment method provider for entering their payment method information.
Two-page payment window is the default terminal option and can be used for all payment methods and optimised for both web and mobile. The standard version for web looks as below.
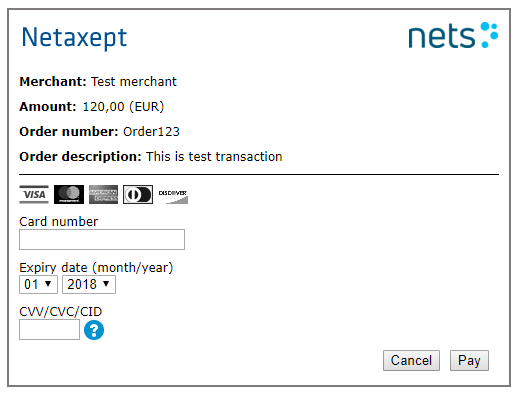
Netaxept payment window in single page mode
In single page mode the customer is directed directly to the actual payment window to enter their card details into the corresponding fields, with the supported card options displayed as small icons above the card number field. After entering the card number, the card type will be identified, and the correct card type will light up as visual feedback to the customer.
Single page payment window is supported only for cards and web terminals. If you are looking to implement other payment methods as well, we suggest you to implement a separate step in your site for selecting a payment method and implementing a path using single page for cards and a separate path for other payment methods. In that case, you need to send the name(s) of the payment method(s) in the "Payment method action list" parameter along the Register call.
To activate the single page mode, set terminalSinglePage=true in the Register call. The standard version for web looks as below.
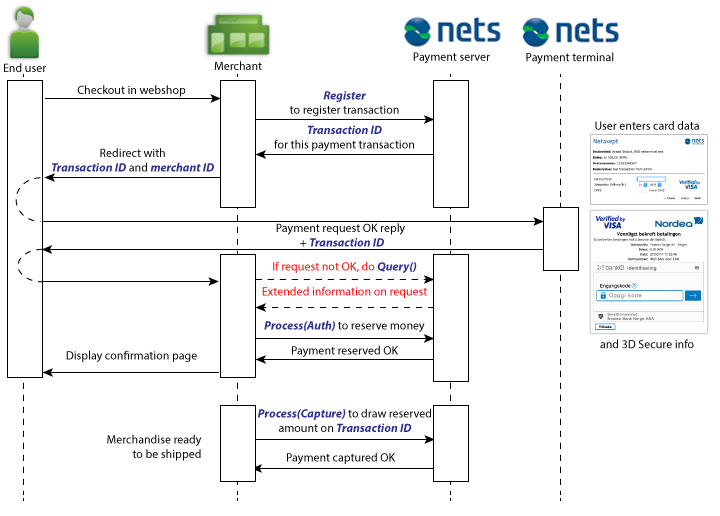
Transaction flow
When implementing Netaxept hosted payment window, the basic payment flow goes as follows.
- Start the payment process by sending the Register call to Netaxept, and set serviceType=B to let us know you will be using a Netaxept hosted payment window. Read more about the Register call
- In Register call, you also need to define whether you want your customers to select the payment method on your site or on Netaxept's payment window.
- Payment method selected on your site: Implement a separate step in your site for selecting a payment method and send the name of the selected payment method to Netaxept in "paymentMethodActionList" parameter along the Register call. Netaxept's payment window is displayed as single-page mode for cards. For other payment methods, the payment window is skipped and the customer is directed directly from your site to the selected payment method site for completing the payment.
- Payment method selected on Netaxept's payment window: The customer is directed from your site to Netaxept's payment window where they will see all the payment methods available in your webshop via Netaxept. After selected the payment method, they are directed to the actual payment window or to the selected payment method site for completing the payment. If you want to define the order of the payment methods on Netaxept's payment window, send "paymentMethodActionList" element along the Register call and list all the payment methods in the desired order. Otherwise, the use of this element is not necessary for this option.
- After the successful registration, use the Terminal call to redirect the customer’s web browser to the checkout. The payment window shows up based on your specifications done in the Register call. Read more about the Terminal phase
- If the Response code is "OK", make the financial operation, like authorization (AUTH) or authorization & capture (SALE), to the transaction by using the Process call. Read more about the Process call